
Even if you’re not thinking about night golf every day, having a well-lit course can completely change the experience for players. Extending play into the evening doesn’t just mean more rounds—it also creates a stunning visual atmosphere, highlighting the course’s design and features. But lighting a golf course isn’t just about strapping up some bright bulbs. It’s about understanding the needs of different areas, balancing brightness, and creating something both functional and inviting.
Understanding Golf Course Lighting Needs
Why Visibility Matters
Before you start hanging lights all over the course, it’s worth asking yourself: what do you actually want your golf course lighting to achieve? The main goal is simple but powerful—players need to see clearly. From the tee box to the green, every fairway, bunker, water hazard, and sand trap should be visible without players squinting or struggling to track the ball. Poorly lit areas don’t just make the game frustrating—they can even increase the risk of accidents, especially when carts are moving along paths or golfers are walking between holes at night. For reference, well-designed night golf areas generally aim for 50–100 lux on fairways and 150–200 lux on greens, which ensures enough light to track balls while avoiding glare.
Lighting Different Areas for Different Needs
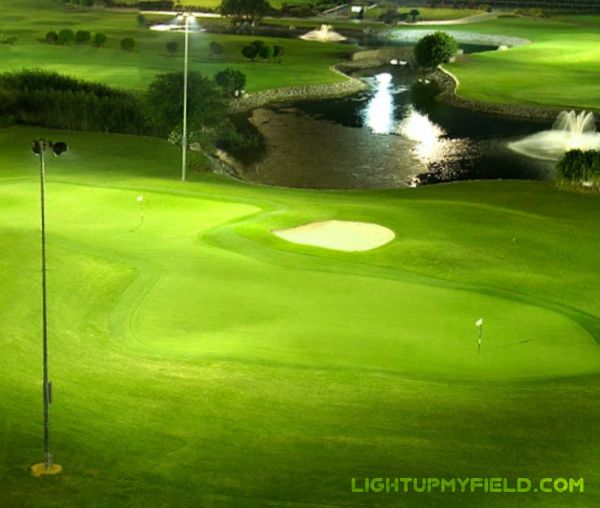
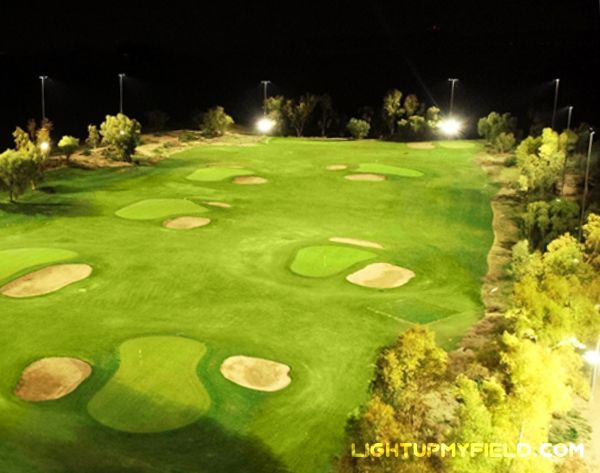 Not every part of the golf course is the same, and neither should the lighting be. Driving ranges require long, straight beams with consistent intensity so players can see the ball in flight over distances of 200–300 yards or more. Meanwhile, greens need softer, more focused lighting, often provided by floodlights angled at about 25–30 degrees, to reveal subtle slopes and contours that affect putting. Even slight differences in shadow can throw off a player’s perception, so precision lighting here makes a big difference.
Other areas often overlooked, like cart paths, walking trails, and clubhouse surroundings, also benefit from good illumination. These areas don’t need super bright floodlights, but evenly spaced fixtures providing 10–20 lux along paths improve safety without causing glare. It’s all about blending function and comfort, so golfers feel safe while keeping the night environment natural.
Aesthetic Appeal: Making the Course Shine
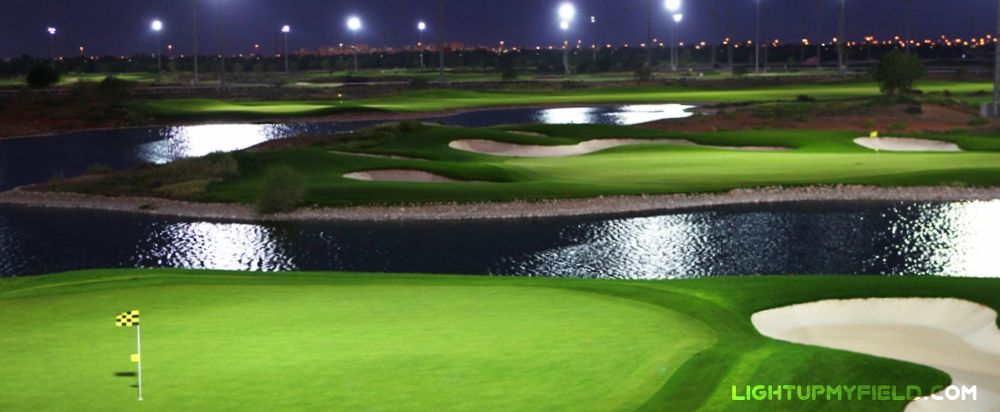
Night golf isn’t just about playability—it’s also about creating a vibe. A well-lit course can be downright magical. Thoughtful placement of lights can highlight water features, trees, bunkers, or architectural details of the clubhouse, adding depth and visual interest. For instance, uplighting certain trees at 5–7 meters high can cast elegant shadows on fairways, while soft perimeter lights along ponds can give the course a shimmering, almost cinematic effect. A course with layered lighting not only looks better but also helps players orient themselves, subtly guiding them from hole to hole.
Even small design choices matter. Using warm-white LED lights (around 3000–4000K) can create a more natural look that doesn’t distort the colors of the grass or sand, while avoiding the cold, harsh glow that cheaper halogen or metal halide lamps can produce. Mixing floodlights for wide coverage with spotlights for features can make the course feel bigger and more inviting, which can even enhance the experience for spectators at night tournaments or events.
Balancing Performance and Sustainability
Another aspect to think about is energy use. Golf courses can be huge, often 50–150 hectares, so lighting everything indiscriminately can become a massive electricity drain. Smart design ensures that only the areas that need illumination are lit, and dimmers or motion sensors can further reduce energy consumption. LEDs not only last longer but use up to 70% less energy than traditional metal halide lamps, so over time, a well-planned night lighting system can pay for itself while keeping the environmental footprint lower.
Key Principles of Golf Course Lighting Design
Start With Uniform Illumination
Once you’ve figured out what your lighting needs are, the next step is thinking about how to light the course effectively. It’s not just about throwing up a bunch of poles and bulbs—good golf course lighting is about strategic placement, beam control, and thoughtful angles.
A big principle to keep in mind is uniform illumination. Players shouldn’t have to constantly adjust their eyes between dark patches and overly bright areas. On fairways, for instance, a target of 50–100 lux (about 5–10 foot-candles) is usually enough to track the ball over long distances, while greens often need 150–200 lux (15–20 foot-candles) to make subtle slopes and breaks visible. Shadows can throw off depth perception, especially around the hole, so floodlight angles, mounting heights, and spacing all need careful planning. A slight misalignment of just a few degrees can leave unevenly lit spots or distracting shadows, which might make putting more frustrating than fun.
Choosing the Right Lights
The type of lighting matters just as much as placement. LEDs dominate modern golf course lighting because they’re long-lasting, energy-efficient, and can be precisely aimed. A single LED fixture can cover a 20–30 meter radius if mounted around 8–10 meters high, making them ideal for fairways and driving ranges.
Color temperature also plays a huge role. You want something that lets players judge distances and see the ball clearly without washing out the natural colors of grass or sand. Most courses aim for around 4000K, which is a neutral white that keeps visibility sharp without looking harsh. Warmer temperatures, like 3000K, give a cozier feel for pathways and clubhouse surroundings, while cooler lights can look unnatural on fairways.
Beam control is another key part of design. Using narrow flood beams for greens ensures precision lighting, while wider-angle fixtures can cover longer stretches like tees and fairways. Modern golf lighting often combines downlights, uplights, and angled floodlights to create a layered effect that looks natural and keeps the entire course well-lit.
Minimizing Glare and Spillover
Glare is the enemy of a good night game. Misaligned lights can blind players, reflect off wet surfaces, or even annoy nearby residents. To avoid this, designers often use shields or cowls on fixtures to control light spill. Adjusting the tilt so the beam hits only the intended area is essential—too steep and you get bright hotspots, too shallow and you leave dark gaps.
Considering horizontal and vertical lux is important here. Fairways usually target horizontal illumination of 50–100 lux, but vertical lux along the eye line of the player should be at least 30–50 lux so the ball is visible when in mid-air or on slopes. Greens need vertical lux around 80–120 to properly see breaks and contours. Taking both into account ensures players can track the ball, read the green, and navigate hazards comfortably without squinting or being blinded.
Smart Layout and Angles
Lighting a course well is also about angles and layering. For instance, floodlights mounted at about 25–30 degrees above horizontal provide broad coverage for fairways without creating harsh shadows. On greens, slightly lower mounting heights—around 5–7 meters—and narrower beams give precise illumination without washing out the hole area. For tees and hazards, wider beams with poles spaced 30–50 meters apart usually provide enough coverage.
The goal is for lighting to feel invisible. Golfers should notice the course and its features, not the lights themselves. The best lighting highlights the ball, terrain, bunkers, and hazards while remaining subtle and natural, blending with the evening environment.
Energy Efficiency and Practical Considerations
Even with perfect placement, a lighting system can be wasteful if not planned with efficiency in mind. LEDs cut energy use by 60–70% compared to traditional metal halide lamps, and adding timers, dimmers, or motion sensors on low-traffic areas like cart paths can further reduce power consumption. This isn’t just about saving money—it also keeps the course eco-friendly and avoids over-lighting areas unnecessarily.
| Area | Horizontal Lux | Vertical Lux | Mounting Height (m) | Beam Angle (°) | Coverage Radius (m) |
|---|---|---|---|---|---|
| Fairways | 50–100 | 30–50 | 8–10 | 25–30 | 20–30 |
| Greens | 150–200 | 80–120 | 5–7 | 25–30 | N/A |
| Tees & Hazards | 50–100 | 30–50 | 6–10 | Wider | 30–50 |
| Pathways / Cart | 10–30 | 10–20 | 3–5 | N/A | N/A |
| Driving Range | 50–100 | 30–50 | 8–12 | N/A | 200–300 (yard) |
Design and Layout Considerations
Pole Placement and Height
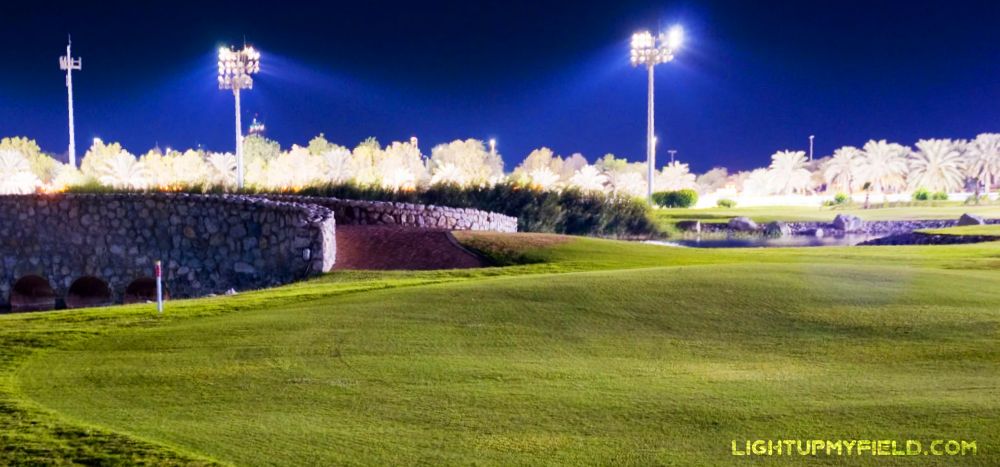
 So, where should the lights actually go? Pole placement and height are huge factors in making a course playable and visually appealing at night. Poles that are too short might not spread light far enough, leaving dark patches on fairways or greens. On the other hand, poles that are too tall can create glare, hotspots, or even light pollution, especially if neighbors are nearby.
For fairways, mounting heights between 6–9 meters (20–30 feet) usually work well, providing enough spread to cover long distances without leaving gaps. Greens, where precision matters, often benefit from slightly lower fixtures—around 5–7 meters (16–23 feet)—so the light focuses on subtle slopes, breaks, and holes without washing out the surface. Driving ranges may need even higher poles in some areas, up to 12 meters (40 feet), to allow players to track balls flying 200–300 yards without shadows interfering.
Pole spacing matters just as much as height. On fairways, spacing lights 30–50 meters apart often creates uniform horizontal lux of 50–100, while greens may need spacing closer to 20–25 meters to achieve 150–200 lux and ensure contours are visible. Poor spacing can result in uneven lighting, forcing players to squint or misread breaks on the green.
Angle and Beam Control
Mounting height is only one part of the puzzle. The angle of the lights and beam control make a huge difference in how the course looks and feels. Tilt a fixture too steeply, and you get harsh shadows; too shallow, and parts of the fairway remain dark. Ideally, floodlights for fairways are aimed around 20–30 degrees from horizontal, creating broad coverage without causing glare at eye level. Greens often use narrower beams at 25–30 degrees, giving precise, uniform light across the putting surface.
Different areas require different approaches. Hazards and bunkers can be highlighted with focused spotlights, making them visible without being distracting. Trees or water features can be subtly lit with uplighting, giving depth and a sense of dimension while still keeping the ball and players as the main focus. Layered lighting, combining floodlights, spotlights, and low-level pathway lighting, helps create a natural, immersive night golf experience.
Using Simulation for Smart Planning
Here’s where tech can save a ton of headaches. Lighting simulation software lets you model the course in 3D before installation. You can test pole heights, angles, spacing, and beam widths to see exactly how lux levels spread across fairways, greens, and hazards. Simulation can reveal dark spots, glare issues, or over-illumination before a single fixture is installed.
While it may sound fancy, investing in simulation upfront can save thousands of dollars in installation adjustments and re-wiring later. It also helps planners hit target lux levels more accurately—for example, achieving consistent 50–100 lux on fairways, 150–200 lux on greens, and 10–20 lux along cart paths. Even minor adjustments in angle or beam width in the simulation can eliminate shadows that would otherwise mess with putting accuracy or ball tracking.
| Area | Mounting Height (m) | Pole Spacing (m) | Horizontal Lux | Beam Angle (°) | Coverage / Distance |
|---|---|---|---|---|---|
| Fairways | 6–9 | 30–50 | 50–100 | 20–30 | Long distances |
| Greens | 5–7 | 20–25 | 150–200 | 25–30 | Precise coverage |
| Hazards / Bunkers | 5–8 | 20–30 | 80–150 | Focused | Targeted areas |
| Driving Range | 8–12 | N/A | 50–100 | N/A | 200–300 yards |
| Cart Paths / Walkways | 3–5 | 8–15 | 10–20 | N/A | Short distances |
Compliance, Standards, and Regulations
Why Rules Matter
It can be tempting to just place lights wherever they look good, especially when trying to highlight a beautiful tree line or a sparkling pond. But lighting a golf course isn’t just about aesthetics—there are rules for a reason. Local building codes often regulate light pollution, fixture height, orientation, and energy usage, and ignoring these can lead to fines or even require removing lights that are already installed. Some areas also have restrictions on spillover to neighboring properties, so careful planning is not just smart—it’s necessary.
Even something as subtle as a bright LED shining across a fence line can cause complaints or violate ordinances. By thinking about compliance early, you avoid costly reworks and ensure the course fits smoothly into its surroundings.
International and Industry Standards
Beyond local codes, sports lighting standards give guidance for proper illumination. For night golf, fairways generally need 50–100 lux, which is enough for players to see the ball in flight and track it across long distances. Greens are trickier—they often need 150–200 lux, depending on the skill level and tournament requirements, so players can read slopes, breaks, and pin positions accurately.
These numbers are a starting point, but vertical lux is just as important as horizontal lux. For example, ensuring 30–50 vertical lux along the eye line of players allows them to see the ball in mid-air, on slopes, and in hazards. Following these standards doesn’t just tick boxes—it ensures your lighting actually supports gameplay rather than creating frustrating shadows or glare.
Energy Efficiency and Smart Controls
Energy use is another factor that can’t be ignored. Golf courses are huge, often 50–150 hectares, so running high-intensity floodlights for hours every evening can get expensive fast. LEDs are the obvious choice—they use up to 70% less energy than traditional metal halide or halogen lamps. But you can go even further with timers, dimmers, or motion sensors, especially along cart paths, walkways, or less-used practice areas. Smart systems allow lights to ramp up only when players are nearby or dim during quiet hours, cutting costs without compromising safety or playability.
Integrating these measures also helps with environmental responsibility, reducing energy waste while keeping the course functional. Some courses even link lighting controls to weather sensors, so during heavy rain or fog, lights adjust to maintain visibility while minimizing glare.
Making Compliance Work for You
Following standards and regulations doesn’t have to limit creativity. By designing with rules in mind—lux targets, vertical and horizontal illumination, glare reduction, and energy efficiency—you can create a night golf experience that’s both safe and visually stunning. Good planning upfront avoids headaches, reduces operational costs, and keeps the course open to the public without conflict.
Cost Considerations
Lighting a golf course is definitely an investment, but thinking about costs upfront can save you surprises later. The total price depends on several factors—the size of the course, the type of fixtures you choose, the sophistication of control systems, and installation complexity.
| Item | Cost Range / Value | Notes / Coverage |
|---|---|---|
| Fairway LED Poles | $1,500 per pole | Covers 30–50 m of fairway, 50–100 lux |
| Premium Green Fixtures | $3,000–$5,000 per fixture | Adjustable beams, higher CRI, smart controls |
| Installation (18-hole course) | $50,000–$100,000 | Includes trenching, wiring, permits |
| LED Lifespan | 50,000+ hours | ~15–20 years if used 8 hours/night |
| Potential Revenue Increase | 20–30% | Evening rounds, memberships, events |
Fixture Costs
Starting with the lights themselves, basic LED poles for fairways usually run around $1,500 per pole, which is enough to cover about 30–50 meters of fairway with consistent 50–100 lux. Greens require more precise illumination, so premium fixtures with adjustable beams, higher CRI (Color Rendering Index), and smart controls can range from $3,000 to $5,000 each. Some courses even use specialized spotlights for bunkers, water hazards, or tree lines to create that layered, professional look, which adds to the upfront cost but makes a huge difference in the night experience.
Installation Expenses
Installation isn’t just about digging holes for poles. You also have trenching for cables, running underground wiring, installing control panels, and securing necessary permits. For a typical 18-hole course, these costs can add $50,000 to $100,000, depending on terrain and complexity. If your course includes long-range areas like driving ranges or oversized greens, expect costs to be on the higher end.
Don’t forget that installation quality affects long-term efficiency. Poorly mounted poles or misaligned fixtures can create uneven lux levels, meaning you may have to re-adjust or even replace fixtures sooner than expected. Investing in professional installation can save headaches and money in the long run.
Maintenance and Longevity
Once your lighting is in place, maintenance is surprisingly manageable. LEDs often last 50,000 hours or more, which is equivalent to roughly 15–20 years of nightly play if used 8 hours a day. Occasional inspections, cleaning, and bulb replacements keep the system performing at peak efficiency. Smart controls also reduce wear on the lights because they dim or shut off when full power isn’t needed, extending the lifespan of each fixture.
Return on Investment
The initial outlay might seem high, but night lighting can pay for itself over time. Extended hours mean more rounds, attracting both casual and serious golfers. Evening play can also boost memberships, increase food and beverage sales at the clubhouse, and allow your course to host night tournaments or events. Some clubs report a 20–30% increase in evening revenue after installing properly designed night lighting.
Case Studies and Examples
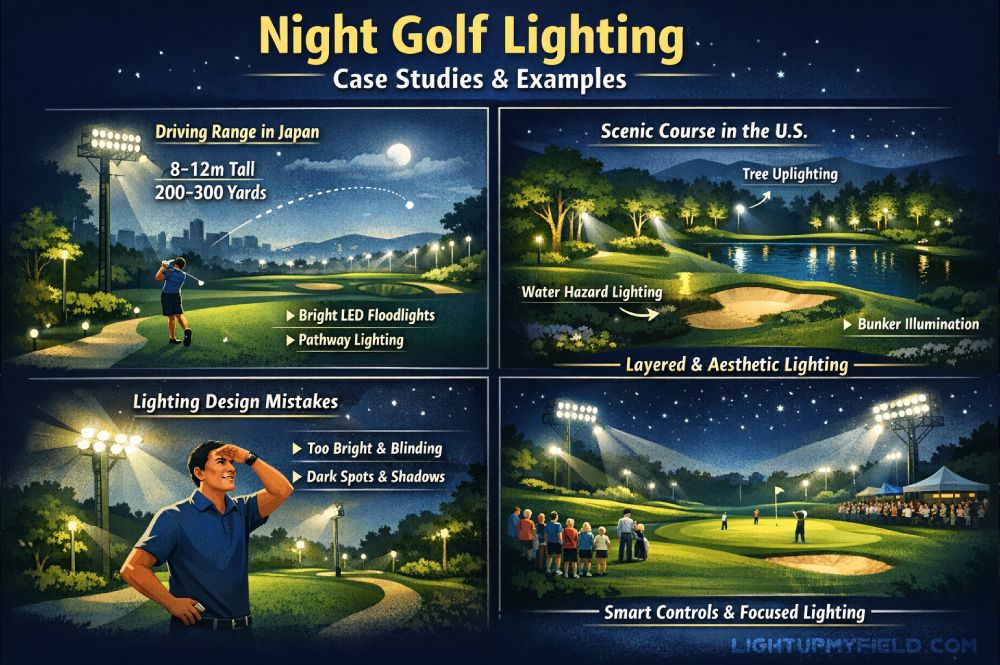
Some golf courses have truly mastered the art of night lighting, turning what could be a simple evening round into a full-blown experience. Take driving ranges in Japan, for instance. They often use high-powered LED floodlights mounted around 8–12 meters high, allowing players to track balls flying over 200–300 yards. These aren’t just functional—they’re designed so golfers can see the ball clearly against dark skies, while the surrounding area remains soft and non-distracting. Ground-level pathway lighting along these ranges doesn’t just enhance safety; it creates a visual rhythm as players move along, almost like a cinematic stage guiding them from one shot to the next.
In the U.S., several night golf courses have taken aesthetics seriously. Instead of blasting bright light across the entire course, they use layered lighting—a mix of uplights, downlights, and low-level pathway lights. Trees along fairways might be softly uplit from 5–7 meters high, while water hazards reflect subtle floodlights to give a shimmering effect. Bunkers get slightly brighter but focused lighting so players can judge sand depth and slopes without the entire hole being washed in glare. Courses like this don’t just make night golf playable—they make it visually memorable.
Even mistakes can be informative. Some older courses that installed lights without proper planning ended up with overly bright poles that blinded players, or gaps in coverage where balls seemed to disappear in shadows. These problems highlight why simulation, beam angle adjustment, and careful pole spacing are so valuable. Using modern lighting software, designers can check both horizontal and vertical lux levels—fairways at 50–100 lux, greens at 150–200 lux, and hazards or cart paths at 10–30 lux—before even installing a single fixture. This approach saves money, prevents frustration, and ensures players actually enjoy night rounds instead of complaining about poor visibility.
Another example comes from clubs that host evening tournaments. They often integrate smart controls, dimming lights on less critical areas and ramping up illumination on greens, tees, and high-traffic fairways. This not only reduces electricity costs but also creates dramatic visual effects for spectators without overwhelming the players. Players notice the difference immediately: greens are crisp, fairways are evenly lit, and hazards are obvious without being glaring.
These case studies show that good night lighting is a mix of planning, precision, and creativity. When designed thoughtfully, it enhances gameplay, improves safety, and transforms a normal course into a truly immersive night golfing experience.
Making Your Golf Course Shine
Lighting a golf course well takes thought, planning, and some investment, but the payoff is huge. A well-lit course is safer, more playable, and can even be a huge draw for players looking for a unique experience. From pole placement to beam angles, color temperature, and energy efficiency, each element contributes to a course that feels alive after sunset.
If you’re thinking about upgrading or installing new lighting, it’s worth chatting with experts who understand both the technical and aesthetic sides of golf course lighting. With the right guidance, your course can shine at night while keeping energy costs manageable and players happy. Feel free to reach out to explore solutions and get a tailored consultation for your specific course needs.